TLS
Introduction
Transport Layer Security (TLS), and its now-deprecated predecessor, Secure Sockets Layer (SSL), are cryptographic protocols designed to provide communications security over a computer network. Several versions of the protocols find widespread use in applications such as web browsing, email, instant messaging, and voice over IP (VoIP). Websites can use TLS to secure all communications between their servers and web browsers.
The TLS protocol aims primarily to provide privacy and data integrity between two or more communicating computer applications.
Why TLS?
When data is send with the HTTP-protocol it is in clear text. Anyone can see it. Don't trust your ISP or any middleman in the line.
The website your are visiting can be run with HTTP but you cannot be shure the data is from my server. The content is public, so that no problem.
We need TLS when we allow web visitors to upload to the server by login, formmail or registering as a member or submitting comments to a blog.
Also search-engines give sites that use HTTPS higher rankings.
Which site use TLS
When we look at the URL we see a padlock symbol when there is TLS/SSL encrytion active. The pictures show the URL on Firefox. Other browsers show it different.
When the name of the firm is shown, the certificate is verified for ownership of the site. Higher level of trust.
| This website don't use TLS/SSL encryption. Only allowed for sites without formmail, comments, login etc. | |
| This website use TLS/SSL encryption. Good for all sites excecpt commercial sites like e-commerce and banks. | |
| This website use TLS/SSL encryption and is who its claims to be. The best option for commercial use. |
The shield-symbol has nothing to do with TLS/SSL. Its part of Adblock plus.
Type of certificates
There a several type of certifcates that you can use.
Certificate quality
Three certificate types are currently in use:
| Domain-validated (DV) | Domain Validation (DV) is a short process that only requires the buyer to prove ownership of the domain or URL. The certificate authority sends an email to the domain owner listed in the WHOIS database. This single validation is useful if you need a certificate right away, but it is the lowest standard on the Internet and should be trusted as such. |
|---|---|
| Organization-validated (OV) | |
| Extended-validation (EV) | An EV certificate requires nine additional steps, including verification of a public business phone number, the company's establishment date, and its registration number and jurisdiction. It also includes a domain fraud check, blacklist check, and a phone call to verify that the applicant actually works for the company. |
- www only: www.example.com and example.com
- wildcard: *.example.com, every service can be encryted with it like FTP, SMTP or multiple sub-domains.
Buying an certificate
You can buy the pair by an CA.
Download both, mostly separate.
You will need an yearly update of the crt.
Let's encrypt
If you only needs http certificates you can use the free lets encrypt certificates.
These certificates are DV and not suitable for companies.
Creating a certificate pair
Create a pair for authentication by an CA
Firts contact your CA for intstructions. You can possible buy an pair.
Do not use a passphrase for the key.
# openssl req -new -newkey rsa:4096 -nodes -out example.com.csr -keyout example.com.key -sha256
Generating a 4096 bit RSA private key
............................................................+++
............+++
writing new private key to 'example.com.key'
-----
You are about to be asked to enter information that will be incorporated
into your certificate request.
What you are about to enter is what is called a Distinguished Name or a DN.
There are quite a few fields but you can leave some blank
For some fields there will be a default value,
If you enter '.', the field will be left blank.
-----
Country Name (2 letter code) [XX]:NL
State or Province Name (full name) []:.
Locality Name (eg, city) [Default City]:.
Organization Name (eg, company) [Default Company Ltd]:.
Organizational Unit Name (eg, section) []:.
Common Name (eg, your name or your server's hostname) []:*.example.com
pa3cjd@amsat.org []:webmaster@example.com

Please enter the following 'extra' attributes
to be sent with your certificate request
A challenge password []:
An optional company name []:
# ll
totaal 8
-rw-r--r--. 1 root root 1037 okt  7 20:10 example.com.csr
-rw-r--r--. 1 root root 1704 okt  7 20:10 example.com.key
A Certificate Signing Request is a block of encoded text that contains information about the company that an SSL certificate will be issued to and the SSL public key. Once a CSR is created it is difficult to verify what information is contained in it because it is encoded. Since certificate authorities use the information in CSRs to create the certificate, you need to decode CSRs to make sure the information is accurate. To check CSRs and view the information inside of them, enter:
# openssl req -in example.com.csr -noout -text
Check if everyting is correct. If not delete the set and create a new set.
Test the CSR here.
Send example.com.csr to your CA for signing. Keep your .key file save.
Move the key file to:
# mv example.key /etc/pki/tls/private/
# cd /etc/pki/tls/private/
# chmod 0640 example.com.key
When the .csr file is signed you receive a .crt file and the intermediate and root CA files.
Your certifcate is only a year valid, so you must replace it every year. Including the chains.
Testing your certificate files
Before you install the files first test them.
It is very important to ensure the SSL certificates you are using are not expired or on the verge of being expired. Negligence in this regard can have a devastating impact on the production systems.
Certificate files usually have a .pem or .crt extension. You can use the openssl commands to explore the details of a certificate. For example, the below command gives the details of the certificate you created above:
openssl x509 -in mycert.pem -text -noout
Certificate:
    Data:
        Version: 3 (0x2)
        Serial Number:
            4c:1b:50:a9:44:bb:c5:00:cf:c1:ef:bf:92:23:21:dc
    Signature Algorithm: sha256WithRSAEncryption
        Issuer: C=GB, ST=Greater Manchester, L=Salford, O=Sectigo Limited, CN=Sectigo RSA Domain Validation Secure Server CA
        Validity
            Not Before: Jul 10 00:00:00 2024 GMT
            Not After : Jul 11 23:59:59 2025 GMT
Installing the certifcate files
Use the home dir from de root to create the pem files. Copy the files to this directory. Be sure you use the linux files.
Check with vi if the cursor start on a new line at the end in all .crt and .pem files. If not add one <CR> to do so.
If you see ˆM at the end of each line remove them. Also notify the seller.
Instead of example.com use your own.
# cd
# cp example.com.key /etc/pki/tls/private
# cp example.com.crt /etc/pki/tls/certs
# cd /etc/pki/tls/private
# chmod 0640 example.com.key
# chcon system_u:object_r:cert_t:s0 *.key
If the intermediateCA and rootCA are separete, make a bundled one.
# cd
# cp intermediateCA.crt example.com_ca-bundle.pem
# cat rootCA.crt >> example.com_ca-bundle.pem
# cp example.com_ca-bundle.pem /etc/pki/tls/certs
If there is a bundled one rename it to example.com_ca-bundle.pem.
Create a fullchain file by:
# cp example.com.crt example.com_fc.pem
# cat example.com_ca-bundle.pem >> example.com_fc.pem
# cp example.com_fc.pem /etc/pki/tls/certs
# cd /etc/pki/tls/certs
# chcon system_u:object_r:cert_t:s0 *.crt
# chcon system_u:object_r:cert_t:s0 *.pem
Backing up de certificates
# cd
# mkdir example.com
# mv *.key example.com/
# mv *.crt example.com/
# mv *.pem example.com/
# cd example.com/
# tar -cvzf example.com.tar.gz
Move the file to a safe location.
Add the /etc/ directory in your backup script. This also include the certificates.
Using TLS/SSL
After installing the certificates you can use secure connections. You have to add ssl support in the config files. See deamon installations (ftp, smtp, pop3/imap, sql and http) for how to. First check that de deamon works in insecure mode and than add tls/ssl.
Checking TLS is done after the deamon is installed and running.
See the installation mauals of the deamon for how to setup TLS.
TLS protocols
Use only TLSv1.2 and TLSv1.3. SSLv2, SSLv3, TLSv1.0 and TLSv1.1 are deprecated.
TLS ciphers
A cipher suite is a set of algorithms that help secure a network connection. Suites typically use Transport Layer Security (TLS) or its deprecated predecessor Secure Socket Layer (SSL). The set of algorithms that cipher suites usually contain include: a key exchange algorithm, a bulk encryption algorithm, and a message authentication code (MAC) algorithm.
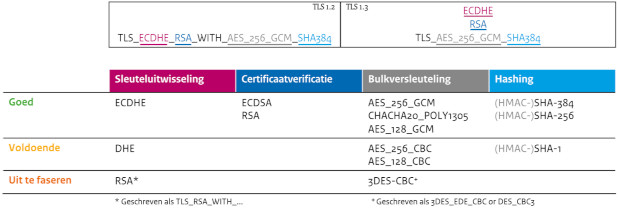
| Order | Key Exchange Algorithm | Authentication Algorithm | Bulk Encryption Algorithm | Mac Algorithm |
|---|---|---|---|---|
| #1 | Elliptic Curve Diffie-Hellman (ECDH) | Elliptic Curve Digital Signature Algorithm (ECDSA) | AES 256 in Galois Counter Mode (AES256-GCM) | SHA384 |
| #2 | Elliptic Curve Diffie-Hellman (ECDH) | RSA | AES 256 in Galois Counter Mode (AES256-GCM) | SHA384 |
| #3 | Elliptic curve Diffie-Hellman (ECDH) | Elliptic Curve Digital Signature Algorithm (ECDSA) | ChaCha20 (CHACHA20) | POLY1305 |
| #4 | Elliptic curve Diffie-Hellman (ECDH) | RSA | ChaCha20 (CHACHA20) | POLY1305 |
| #5 | Elliptic Curve Diffie-Hellman (ECDH) | Elliptic Curve Digital Signature Algorithm (ECDSA) | AES 128 in Galois Counter Mode (AES128-GCM) | SHA256 |
| #6 | Elliptic curve Diffie-Hellman (ECDH) | RSA | AES 128 in Galois Counter Mode (AES128-GCM) | SHA256 |
SSLCipherSuite
ECDHE-ECDSA-AES256-GCM-SHA384:ECDHE-ECDSA-CHACHA20-POLY1305:ECDHE-ECDSA-AES128-GCM-SHA256:
ECDHE-RSA-AES256-GCM-SHA384:ECDHE-RSA-CHACHA20-POLY1305:ECDHE-RSA-AES128-GCM-SHA256
The first line is for TLSv1.3 and the second line for TLSv1.2.
When TLSv1.2 is deprecated just remove the last tree ciphers and the protocol from config files.
Key exchange
These ciphers are not secure, DH-4096, when used:
DHE-RSA-AES256-GCM-SHA384
DHE-RSA-CHACHA20-POLY1305
DHE-RSA-AES128-GCM-SHA256
If you have them remove them.
Restart httpd.
# httpd -t
# systemctl restart httpd
DANE
DNS-based Authentication of Named Entities (DANE) is an Internet security protocol to allow X.509 digital certificates, commonly used for Transport Layer Security (TLS), to be bound to domain names using Domain Name System Security Extensions (DNSSEC).
Setting up dane.