Safe, sensible silverplating
Stake your claim to recycled silver lost in photoprocessing
Have you ever completed a ham radio project and wished to improve its appearance or performance with silverplating? When I finished the duplexer described in the previous article, I wanted to silverplate it. But my previous experiences with electroplating were not encouraging. I knew I'd have to work with silver cyanide, a highly poisonous solution that emits cyanide gas, which can cause illness and even death. I would also have to obtain an expensive silver rod to use as an anode.
To devise a safe, economical alternative, I turned to black-and-white photography, which employs vast amounts of silver in the manufacture of film and printing papers. Even though much of the silver freed in processing is more often discarded with the spent solu tions than recycled, it can be reclaimed. I reasoned that if it were possible to recover the silver from spent solutions, namely fixer, or "hypo" - then it should also be possible to capture that silver on a copper tube.
Getting started
The first step in silverplating with reclaimed silver is obtaining an ample supply of exhausted fixer. Sources include photography labs or stores, graphic arts firms that make blueprints or photographic enlargements and reductions, printers with graphic arts departments, and the photography departments of schools and colleges. Friends who process their own film and print their own black-and-white pictures are also good sources.
The best fixer (for your purposes) is that which has been well used; used fixer carries a greater amount of silver than fixer used only slightly. Consequently, your best source of spent fixer may be the least fastidious photographer.
Once you've acquired your solution, obtain a simple dry cell. (I used a 7-year old 6-volt lantern battery.) You'll also need a 10k potentiometer, a 100 mA movement meter, and a carbon rod. (My carbon rod, salvaged from a discarded No. 6 dry cell, measured about 0.75 inches - 20 mm - by about 5 inches 137.5 mm.)
Wrap the carbon rod in an ordinary kitchen sponge. Secure the sponge with rubber bands. You are now ready to silverplate.
Silverplating your project
- Connect the battery, potentiometer, carbon rod, and meter as shown in fig. 1.
- Carefully clean the items to be plated. You will probably want to use fine steel wool and trisodium phosphate. Both of these materials are available in the paint section of large hardware stores or in a paint store. Once the item is clean, do not touch it with your fingers. The oils on your skin can contaminate the surface, ruining an otherwise effective cleaning job.
- Connect the minus clip to the item to be plated and the plus clip to the sponge-wrapped carbon rod. (See fig. 2.)
- Pour some fixer into a glass or plastic bowl. Do not use a metal container.
- Dip the sponge-wrapped carbon rod into the bowl of used fixer and rub the sponge-covered rod along the surface of the item to be plated as shown in fig. 3. At the same time adjust the pot for a reading of from 50 to 100 mA. (50 mA is a good choice.) As you rub the sponge-covered rod along the surface of the item to be plated, you will see the silver begin to collect on the item you are plating.
- With a little practice, you'll soon be able to evaluate the uniformity and thickness of the silver plate. When you are satisfied, go on to the next piece to be plated.
- Should you want to plate a large, long tube, simply put the sponge on a long stick and slide it inside the tube. (This is simpler and safer than filling the tube with cyanide solution and then inserting a long silver anode into the tube [fig. 4]).
Fig. 1. Basic connections for silverplating with photographic fixer.
Fig. 2. Silver plating with photographic fixer. Note basic connections and how the fixer-soaked, sponge-covered carbon rod is rubbed along the surface of the item to be plated.
Fig. 3. Silver plating the tuning rod of a cavity.
Fig. 4. Silver plating the inside of the main tubing of a cavity.
At this point I want to caution you about "flash" plating, which can occur if you don't actively guard against it. "Flash" plating occurs when metals that are high on the activity scale (silver and copper, or silver and brass, for example) come in contact with each other in the absence of a flow of current. "Flash" plating looks good but is not permanent. You can prevent it by making sure that the battery is connected every time the item to be plated comes in contact with the fixer-soaked sponge. This is the purpose of connecting the battery (as shown in step 3 above) before you poured the fixer into the bowl.
If your fixer begins to weaken before you've completed the job, but you don't have any more fixer on hand, try this method of rejuvenating the solution. Find an unwanted silver item such as an old vase or piece of discarded flatware. (I used an old silver coin which had been in a fire and was all bent out of shape.) Connect the unwanted silver item to be plated and reverse the battery connections. (The meter will read backward unless you reverse its lead. See fig. 5.) Place both the silver item and the carbon rod in the fixer solution. Then adjust the potentiometer for a 75 mA reading on the meter. The silver will turn black. After about 10 or 15 minutes, you can resume silverplating for a while longer but don't forget to reverse the battery and mA meter leads. I don't know how long or how many times you can go through this rejuvenation cycle. I did it about six times and it seemed to work fine.
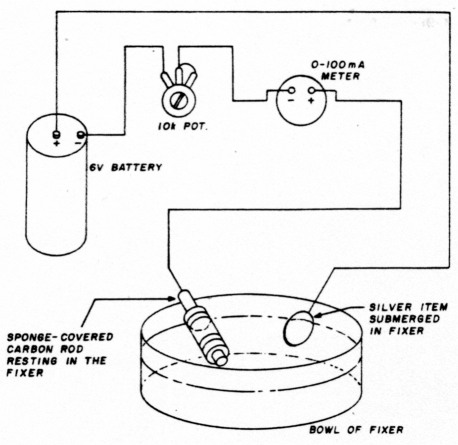
Fig. 5. Rejuvenating the depleted fixer: set the potentiometer for a meter reading of approximately 75 mA and wait for about 15 minutes.
I'm sure you'll obtain good results if you follow these suggestions. My cavities looked 100 percent better after they were plated and I know they work better, too. So, go ahead and silverplate your next ham radio project.
K9EYY, J.S. Gurske.