A 40 Watt transmitter for 220 Mc
Stability and efficiency in an easy-to-build layout.
As we go higher in frequency it becomes more and more difficult to build an exciter that develops adequate drive. At 144 Mc we begin to run out of tubes that will work efficiently, and at 220 Mc the choice is limited, indeed. In the course of working out the transmitter shown herewith, most available tubes were tried in various combinations. The objective was a fairly simple transmitter that would also serve as a driver for a kilowatt amplifier. We hoped to have each stage running easily, so that there would be no overheating anywhere along the line, yet we didn't want to employ an excessive number of tubes and stages to achieve this end.
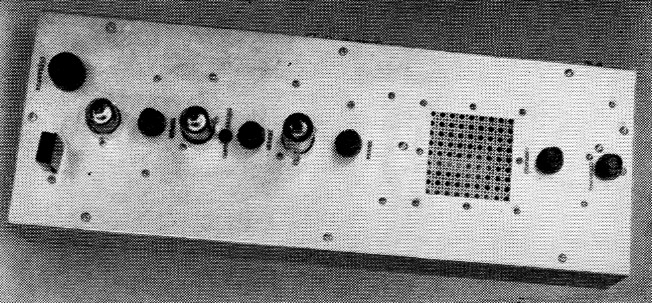
Top view of the 220 Mc transmitter. Final amplifier tube is inside the chassis, below the screened ventilation hole. Power connections, keying jack and output terminal are on the back of the chassis.
Though its principal intended use was as a driver for higher-powered amplifiers, the exciter is designed so that its final stage may be modulated for voice operation at 30 to 40 watts input. In this service it will deliver power enough for much interesting work on 220 Mc. The amplifier may be keyed for c.w. operation as well, a feature that has often come in handy in the several months that the rig has been in use at W1HDQ.
Tubes and circuits
A simple overtone oscillator circuit uses one half of a 12AT7 dual triode. The crystal may be between 8.15 and 8.33 Mc. or 24.45 and 25 Mc. In either case, the frequency of oscillation is in the latter range, as the crystal works on its third overtone. The second half of the 12AT7 is a tripler to 73 to 75 Mc. This stage has a balanced plate circuit, so that its output may be capacitively coupled to the grids of a second 12AT7, working as a push-pull tripler to 220 Mc. Note that the low side of the first tripler plate circuit has a balancing capacitor, C3, so that a capacitance equal to the output capacitance of the 12AT7 can be added to that side of the circuit. Without this the two halves of the push-pull tripler may receive unequal drive, and one half of the tube will run hotter than the other.
The plate circuit of the push-pull tripler is inductively coupled to the grid circuit of an Amperex 6360 dual tetrode amplifier that runs straight through on 220 Mc. Several different tubes were tried here, but the 6360 gave more output with the limited drive available than other types. The grid return of the 6360 stage has a tip jack for insertion of a meter to measure grid current. This is helpful in making adjustments of coupling and tuning in previous stages.
Similar inductive coupling transfers the drive to the grid circuit of the final amplifier stage, an Amperex 6252 dual tetrode. This tube is a somewhat more efficient outgrowth of the 832A, which may also be used, though with lower efficiency and output. Base connections are the same for both tubes. The big brother of the 6252, the 5894, may also be used in the output stage, but some modification of the grid circuit will be necessary because of the greater input capacitance of the larger tube. Within its capabilities, the 6252 is probably the most efficient tube presently available for use at 220 Mc. and higher frequencies, other than much higher-priced coaxial-electrode types.
The grid return of the 6252 is brought out to the terminal strip on the back of the unit, to allow for connection of a grid meter. Both this point and the tip jack in the 6360 grid return have 1000-ohm resistors completing the grid returns to ground, so that operation of the stages is unaffected if the meters are removed.
Instability in tetrode amplifiers for v.h.f. service may develop as a result of the ineffective bypassing of the screen. In the case of the 6360 stage stable operation was obtained with no bypassing at all, while on the 6252 a small mica trimmer was connected directly from the screen terminal to ground. It is operated near the minimum setting.
Construction
The transmitter is built on an aluminum plate 6 by.17 inches in size. This screws to a standard chassis of the same dimensions, which serves as both shield and case. Cutouts about three inches square are made in the chassis and base plate, above and below the tube, to allow for ventilation. These openings are fitted with perforated aluminum or screening to preserve shielding. The case should he equipped with rubber feet, to avoid marring the surface it rests on, and to allow air circulation around the tube.
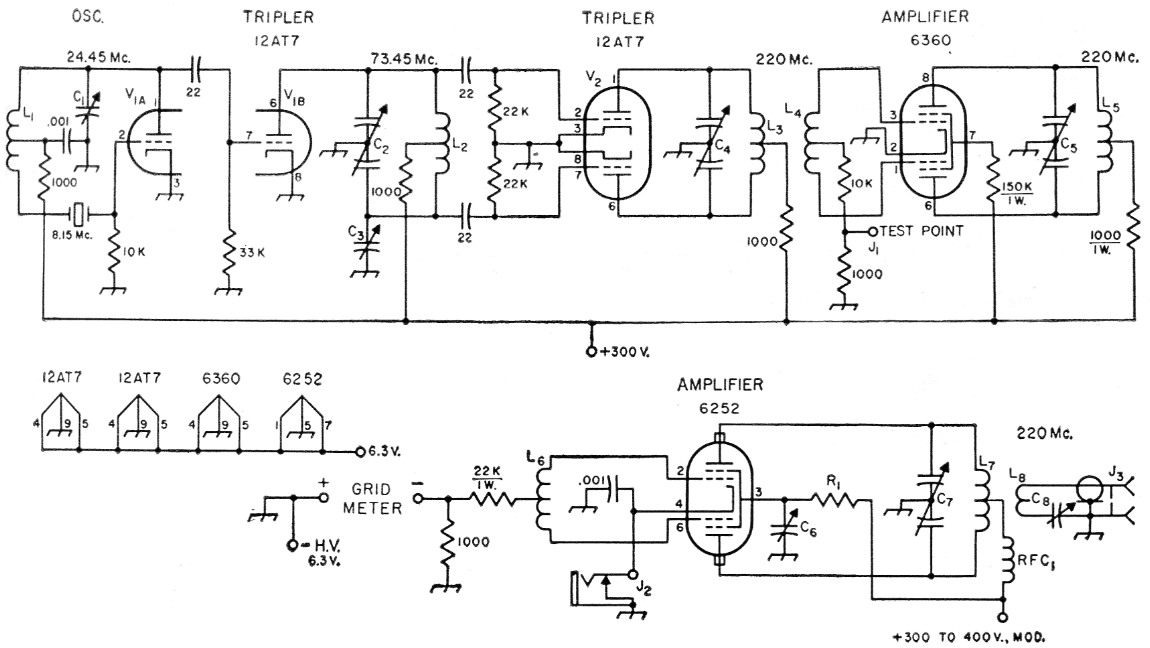
Fig. 1. Schematic diagram and parts information for the 220-Mc. transmitter. Capacitor values below 1 nF are in pF. Resistors ½ watt unless specified.
| C1 | 50 pF miniature variable (Hammarlund MAPC-50-B). |
| C2,C4,C5 | 8 pF miniature butterfly variable (Johnson 160-208). |
| C3,C6 | 3-30 pF mica trimmer. |
| C7 | Butterfly variable, 1 stator and 1 rotor (Johnson 167-21, with plates removed). |
| C8 | 15 pF miniature variable (Hammarlund MAPC-15-B). |
| J1 | Tip jack, insulated. |
| J2 | Closed-circuit phone jack. |
| J3 | Coaxial chassis fitting, SO-239. |
| L1 | 15 t. No. 20 tinned, ½ inch diam., 1 inch long (B & W Miniductor No. 3003). Tap at 4 turns from crystal end; see text. |
| L2 | 12 t. No. 18 tinned, ½ inch diam., 1 inch long, center-tapped. |
| L3,L4,L5,L6 | U-shaped loops No. 18 enam., center-tapped. Dimensions given in Fig. 2. |
| L7 | 2 t. No. 14 enam., 1-inch., 1-inch diam., leads 34 inch long. Center-tapped, space turns 1/2 inch apart. |
| L8 | 1 t. No. 18 enam., inserted between turns of L7. Cover with insulating sleeving. |
| R1 | 23,500 ohms, 2 watts. (Two 47,000 ohm 1 watt resistors in parallel.) |
| RFC1 | 25 t. No. 28 enam. on 1 watt high-value resistor. |
The tube sockets and all the controls except the tuning capacitor of the oscillator are mounted along the center line of the cover plate. The 220 Mc stages are inductively coupled, using hairpin loop tank circuits the dimensions of which are given in Fig. 2. The tuning range of these circuits is affected by the width of the loops as well as their length, so some variation can be had by squeezing the sides together or spreading them apart.
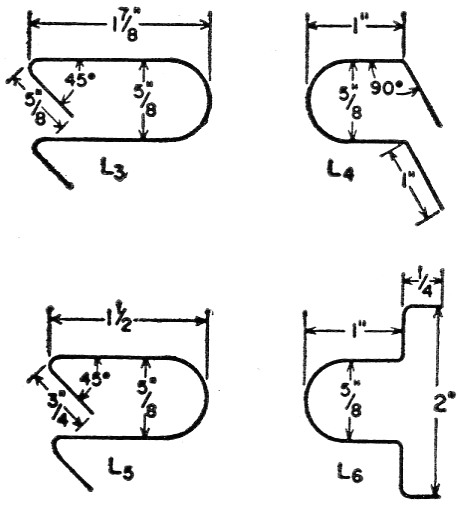
Fig. 2. Details of the hairpin loops used in the 220-Mc transmitter.
It is important that the method of mounting the 6252 socket be followed closely. An aluminum bracket about 2_7/8 inches high and 4 inches wide supports the socket. Note that the socket and tube are on the same side of the plate. Holes are drilled in the plate in line with the control grid terminals to pass the grid leads. These holes are 3/8 inch diameter, and are equipped with rubber grommets to prevent accidental shorting of the grid leads to ground. The shape of the grid inductance should be such that its leads pass through the centers of the holes. The socket is supported on 5/16 inch metal pillars. It may be necessary to bend the socket lugs slightly to keep them from shorting to the mounting plate. The screen trimmer capacitor is just visible in the photograph, on the left side of the mounting plate, projecting out from behind the socket. The heater lead comes over the top of the plate, and the cathode lead bends around the bottom of it.
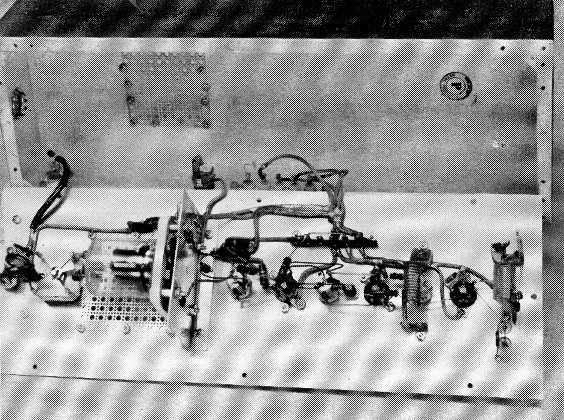
Interior view of the 220 Mc transmitter. Oscillator stage is at the far right. All r.f. components are mounted on an aluminum plate, which is screwed to the top of a standard 6 × 17 inch chassis.
Power leads are made with shielded wire, and are brought out to a terminal strip on the back of the chassis. These leads and the coax to the output connector should be long enough so that the plate on which the transmitter is built can be lifted off the chassis and inverted as shown in the photograph.
Looking at the bottom view, the crystal socket and the oscillator coil and capacitor are at the far right. Next is the first 12AT7 socket. Next to the left is the first tripler plate coil, mounted over its trimmer, with the mica balancing pad-der, C3, above it in the picture. The 12AT7 tripler, the test point, Jl, the tuning capacitor C4, the tripler plate and amplifier grid loops, L3 and L4, the 6360 socket, the 6360 plate and amplifier grid loops, the amplifier mounting plate, the 6252, and its tuned circuits follow in that order. The series capacitor, C8, and the coaxial lead to the output connector, J3, are at the. far left.
Adjustment
Initial tests should be made with a power supply that delivers no more than 250 volts, and as little as 150 to 200 volts can be used. If the voltage is more than 250, insert a 5000-ohm 10-watt resistor in series with the power lead temporarily. Plate voltage should be applied to the various stages separately, starting with the oscillator, making sure that each stage is working correctly before proceeding to the next.
A milliammeter of 50 or 100 mA range should be connected temporarily in series with the 1000-ohm resistor in the oscillator plate lead.
When power is applied the current should be not more than about 10 mA. Rotate C1 and note if an upward kick occurs, probably near the middle of the range of C1. At this point the stage is oscillating. Lack of oscillation indicates too low feedback, or a defective crystal. Listen for the note on a communications receiver tuned near 24 Mc., if one is available. There should be no more than a slight change in frequency when a metallic tool is held near the tuned circuit, or when the circuit is tuned through its range. The note should be of pure crystal quality. If there is a rough sound, or if the frequency changes with mechanical vibration, the oscillator is not controlled by the crystal. This indicates too much feedback, and the tap on the coil, L1, should be moved nearer the crystal end.
The proper amount of feedback is the lowest tap position that allows the oscillator to start readily under load. This will vary with different layouts, and sometimes with crystals. If 24 Mc crystals are used the tap can be lower on the coil than with 8-Me. crystals. When 8-Me. crystals are operated on the third overtone, as in this case, the frequency of oscillation may not be exactly three times that marked on the crystal holder. Crystals whose frequencies multiply out close to a band edge should be checked with care to be sure that you are in the band.
Now apply plate voltage to the second half of the 12AT7, again using a temporary plate meter connected in series with the 1000-ohm decoupling resistor that feeds plate power to L2. Current will be about 10 ma., as with the oscillator. Tune C2 for maximum output. This can be determined by brilliance indication in a 2-volt 60-ma. pilot lamp connected to a 1-turn loop of insulated wire coupled to L2. Check the frequency of this stage with a calibrated wave-meter or a grid-dip meter used in the power-indicating position. Adjustment for maximum output need only be approximate at this point.
Now connect a low-range milliammeter (not more than 10 mA) between the test point, J1, and ground. Apply power to the push-pull tripler, again using a temporary milliammeter connected in the lead to the plate coil, L3. Tune the plate circuit for maximum indication on the grid meter. Plate current will be about 20 mA. Adjust the position of L3 with respect to L4 for maximum grid current. Now go back over all previous adjustments and set them carefully for maximum grid current. Adjust the balancing padder, C3, retuning C2 each time this is done, until the combination of C3 and C3 that gives the highest grid current is found. Check the frequency to be sure that the stage is tripling to 220 Mc.
Now apply power to the 6360 plate circuit, again using the temporary meter to check the current. Connect the low-range milliammeter between the grid-metering terminal on the connector strip and ground. Set the screen trimmer, C6, near minimum, and tune the 6360 plate circuit for maximum grid current. With 300 volt on the preceding stages, it should be possible to get at least 4 mA. Adjust the spacing between L5 and L6 carefully for maximum grid current, retuning Cs each time this is done. Plate current should not exceed 55 mA.
A preliminary check for neutralization of the final amplifier may now be made. Tune the final plate circuit through resonance while watching the grid-current meter. If there is no change, or only a slight rise as the circuit goes through resonance, the stage is near enough to neutralization to apply plate power. The 6252 has built-in cross-over capacitance, intended to provide neutralization in the v.h.f. range, so it is likely to be stable at this frequency. If there is a downward kick in the grid current at resonance, adjust the screen trimmer until it disappears. If best neutralization shows at minimum setting of the screen trimmer it may be desirable to eliminate the trimmer.
Plate power may now be applied to the final amplifier, but first a load should be connected to the coaxial output. The most convenient load at this frequency is a coax-fed antenna. This can be a folded dipole fed through a balun, or a gamma-matched dipole as shown in Fig. 3. Some form of power-indicating s.w.r. bridge is desirable, for the matching adjustment, and it will also indicate proper tuning and loading in the transmitter. If no such device is at hand, connect a 50-watt or larger light bulb to a coaxial connector.
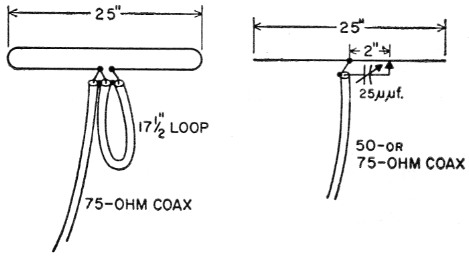
Fig. 3. Coax-fed dipoles for use at 220 Mc. Folded dipole at left can be made from any stiff wire or tubing. Spacing of the wires is not critical, but should be under 1 inch. Only 75-ohm coax will give a good match with the folded dipole, but the gamma match, right, may be used with coaxial line of any impedance.
Adjustments of tuning and loading for maximum output as indicated in the lamp load will not coincide with those for best operation with an antenna, however. The lamp merely serves as a temporary indication that the amplifier is working.
Tune the final plate circuit for maximum output, with a meter of 100 mA or higher range connected to read the combined plate and screen current. This meter may be connected in the power lead, or it can be plugged into the cathode jack. In the latter position it will read the combined plate, screen and grid currents. Tune for maximum output and note the plate current. If it is much over 100 mA, loosen the coupling between L7 and L8. The input should not be over 50 watts at this frequency.
A final check for neutralization should now be made. Pull out the crystal or otherwise disable the early stages of the transmitter. The grid current and output should drop to zero. If they do not, adjust the screen trimmer until they do. Make this test only very briefly, as the tubes will draw excessive current when drive is removed. When perfect neutralization is achieved, maximum output will be found at a setting of C7 at which plate current is at a minimum and grid current at maximum.
Output should be in the vicinity of 20 watt with 40 watt input. The lamp indication may make it appear that higher output is being obtained but lamp brilliance is not a reliable measure. Only a power-indicating device of known accuracy can be trusted at this frequency.
Operation
All stages should be run as lightly as possible, for stable operation and long tube life. No more than 300 volts should be run on the exciter stages, and if sufficient grid drive can be obtained, lower voltage is desirable. The 6360 stage runs with rather low drive, and its efficiency is consequently poor, but it delivers enough power to drive the 6252, even when run at as low as 250 volts, if all stages are operating as they should.
Observe the plates of the tubes when the transmitter is operated in a darkened room. There should be no reddening of the plates. If one side of any of the last three stages shows red and the other does not it is evidence of unbalance. This can usually be corrected by adjustment of the balancing trimmer, C3, in the first tripler plate circuit. Lack of symmetry in lead lengths or unbalanced capacitance to ground in any of the r.f. circuits may also lead to lopsided operation.
Though the 6252 is rated for up to 600 volts on the plates, it is recommended that no more than 400 be used in this application, particularly if the stage is to be modulated for voice work. Pushing the tube to its limit may raise the output by 25 to 50 per cent, but even if the output is doubled it will make only half an S-unit difference at a distant station. From this it can be seen that there is little point in straining for the last watt, if long tube life is important.
For voice work the plate-screen current of the 6252 is run through the secondary of the output transformer on the modulator. The latter should have an output of 20 watt or so. Suitable designs may be found in any edition of the ARRL Handbook. The transmitter may be keyed for c.w. by inserting a key in the cathode jack.
Edward P. Tilton, W1HDQ.