"What's Up Top?"
Maybe taking this trouble periodically won't affect the way you get out. On the other hand, it's unlikely that mechanical deterioration can occur without an accompanying drop-off in electrical performance. The unquestionable reward is the satisfaction of knowing things are in tiptop shape.
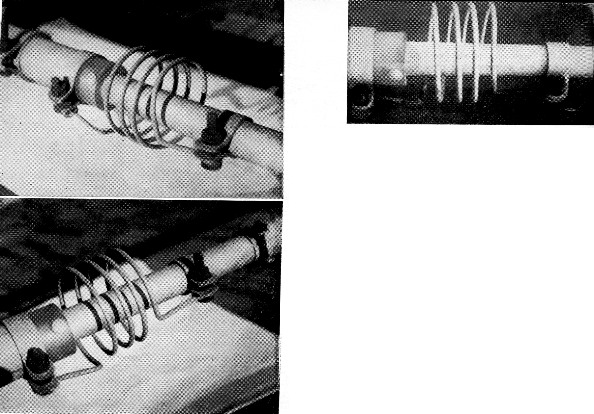
Congealed smog? This pride-shattering sight is the result of two and a half years' exposure.
Say, when was the last time you pulled down your rotary and took a look at it?" asked old pro W6MBA.
"Ohhhhh - coupla years ago," I answer. "But it must be O.K. because I can still work out fairly well, especially if no one else is calling."
"Well, it's a good idea to take a look at an antenna once in a while, clean it up a bit and make sure all the screws are tight," says MBA.
Now this man knows whereof he speaketh. Working 270-plus countries is not at all bad. Maybe I'd better spend an hour or so next Saturday and take a look.
So down comes the beam for a quick cheek - and up go my eyebrows in a long arch. Coils and elements are heavily pitted and corroded with a whitish powder and the bolts are rusted to a rich dark brown color. This must be congealed smog!
We learn that r.f. travels in the outer shell or skin of a radiator. It would seem probable that the cleaner the antenna surface, the better it would serve the intended purpose. Anything in the nature of corrosion would tend to decrease efficiency. Actually, I suppose there would be no noticeable difference to a listener between a kw. signal into a corroded antenna and a kvr. into the same array all polished and gleaming. On the other hand, for a low-powered station even a few watts dissipated by an unkempt antenna might produce a noticeable effect.(1)
Frankly, I don't know how badly a corroded antenna will inhibit r.f. radiation, if indeed it does at all. But I do know this - which is much more important and to the point for most hams - a corroded antenna looks horrible. What's more, it completely shatters the pride of the owner! Clearly, a situation like this should sound the clarion call for action.
If it has been six months or more since you inspected your antenna, and especially if you've been through a long, hard winter, you owe it to your clear conscience to give your antenna an inspection.
Therefore, since antenna work-over weather is here for the rest of the country (it's always antenna work-over weather in W6), a brief review of dos and don'ts associated with refurbishing your beam might inspire you now.
Trap-antenna precautions
There is one thing to be sure of before taking apart any trap-tuned antenna. If you intend to work over the coils - and it's probably a good idea, especially if they are open wound - make certain that you know what frequencies the various traps should be tuned to before you completely dismantle the coil-capacitor assembly.
If your antenna is "store-bought", the resonant frequencies of the traps are always available in the directions for assembly or from the manufacturers. Also be sure that proper lengths of elements are available.
The reason for these precautions is that for proper operation a trap may have to be tuned to a frequency quite different from the ham band it is trapping for. Furthermore, unless the coils are tuned to this designed frequency, the beam won't resonate where it should within the band, and all your cleaning and polishing will have been in vain.
One additional word on the subject of trap frequencies. Don't rely on the frequency you may measure with your grid-dip meter, before you disassemble the trap coil assembly, to provide you with the proper resetting frequency. Out of curiosity I checked the frequencies of the open-wound coils on my tri-bander and, sure enough, they were off - not badly, but they weren't where they had been when I tuned them "on the nose" a few years ago.
These coils may be detuned by a number of things. Weathering and corrosive effects account for much of the trouble. But I was to find out later that open-wound coils can be seriously de-tuned if they are bumped on the roof or against the chimney during assembly and erection. Anything that changes the positions of the coils relative to the tuning capacitance may cause some frequency change. I suppose a good heavy California sparrow could almost tune me up on 40 meters if he lit just right!
The moral here, however, is that if you recall banging your antenna (especially the coils) while you were assembling and raising it, chances are you may have detuned it some. This possibility alone might merit a quick check next Saturday.
Cleaning the metal
The first mechanical step is to clean the corrosion off the coils and tubing. I began by using trisodium phosphate, which as a liquid is used to clean aluminum screens. I used the prescribed solution and also experimented with about every liquid concentration from almost a paste to litpractically pure water. Best results were obtained using a solution a little stronger than recommended on the package for screens. I found, too, that the corrosion just didn't dissolve and disappear in this elixir. It took some pretty heavy applications of elbow grease and steel wool. But the gleaming results were worth every groan. Be sure to hose off the coils and tubing and wipe them dry.
One word of caution about trisodium phosphate. In low concentrations, this chemical may be used as a water softener, but in the solution you would be using for removal of corrosion it is caustic and could burn you. Be sure, therefore, to wear rubber gloves to preclude any possible burn. Gloves also help save the hands from steel wool slivers.
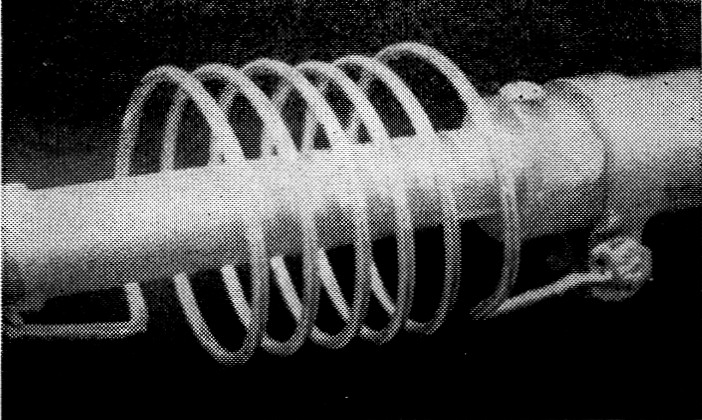
Like new. Aluminum coils and elements after cleaning and painting with zinc chromate and aluminum paint. Those new bolts are cadmium-plated.
Corrosion-proofing
If your tubing is not pitted and is in pretty good physical shape, you may wish to stop at this point and reassemble the antenna. However, in my case, the aluminum was so badly pitted that it seemed a fine idea to paint the coils and elements with something to keep them from corroding again. Zinc chromate is recommended for this sort of thing, so I applied a liberal coat to all coils and tubing.
Next morning I realized there had been a slight mistake. Zinc chromate doesn't carry electrons as aluminum does! So I spent several sad hours scraping long ribbons of zinc chromate from elements and coils, followed by vigorous steelwooling where good bonding was necessary. This was harder work than the first steel-wooling session; so, if you decide to use a protective coat of something like zinc chromate, either be very sure you don't paint over an overlapping joint or junction point, or do your painting after you reassemble and retune your beam.
Another word of caution. Don't breathe too heavily around zinc chromate; it's dangerous to inhale it.
Zinc chromate is a sort of greenish yellow - or maybe it's yellowish green. Some jealous people might say the color blends splendidly with Los Angeles smog. However, aluminum still looks more attractive in a sparkling, conventional sort of way; so it was decided to paint the coils and elements with aluminum paint.
After my experience with the zinc chromate I decided to take advantage of the positive metal-to-metal bond available after a thorough cleaning job, and paint on the aluminum after assembly and tuning. There is one thing to beware of in painting with aluminum. Unless allowed to dry thoroughly, the paint tends to skid or crinkle as tight-fitting elements or coils are slid into adjustment. This is one more reason for delaying the painting until after complete assembly.
Odds and ends
One last important item: Replace rusted or missing screws and bolts with high-quality stainless-steel or cadmium hardware, available at auto accessory shops. Also replace any damaged coupling clamps 'with aluminum ones of your own fabrication, or hose clamps.
Just before assembling the pieces, recheck the frequencies of the traps according to instructions (probably for the nth time). Then, after the beam is correctly and completely assembled and the final touch-up painting is completed, make one last check of all element dimensions. These little extras at this time are excellent peace-ofmind insurance.
Actually, all the cleaning, painting reassembling, and other jobs can be done in a few evenings after work - that is, unless you goof here and there as I did. However, if you will follow a few of the precautions outlined here, your job should go smoothly.
In the future, I intend to concentrate on preventive maintenance. A Saturday afternoon inspection every six months or so should catch any mechanical or electrical problems before they require full-scale treatment. For those of you who do not choose to paint your aluminum, a thorough steel-wooling every six months or so certainly would be in order.
I still don't know whether a corroded antenna will really dissipate r.f. to a significant degree. Maybe I'll never know. But I do know that the old beam is now sparkling like new again (go 'way, birdie). And even though no one else in the world knows or cares - I do! And that's important to any ham.
I guess it works all right, too. Worked VS9OC on the first short call after the beam went back up. Report: 599X. Guess W6MBA was right. It's what's up top that counts.
"Say, when was the last time you pulled down your rotary for a quick check?"
Notes
John G. Troster, W6ISQ, ex-W2ISQ.