Lace that wiring
Neater and more trouble-free gear.
The wiring in any piece of equipment can easily spell the difference between a professional-looking job and something that looks like a rat's nest. This article shows how to cable leads for better appearance and more reliable operation.
How often have you marveled at the excellent paneling and chassis finishes on a piece of electronic equipment only to gasp in engulfing horror at its ugly labyrinth of wiring? Nevertheless, this unfortunate situation is not a hopeless one. Only five cents' worth of lacing cord will improve the aesthetics of this wiring by a thousand per cent! Not only will the lacing increase the resale value of your equipment, but it will also give you the- satisfaction of completing a job neatly. Furthermore, a good lacing technique will give strength and rigidity to your small bundles of wire and will virtually eliminate individual wire breakage.
Types of lacing cord
You can make no better investment for your ham . shack than a roll of lacing cord which meets certain military specifications, MIL-T713A. This type of lacing cord, usually made from either nylon or flax, is uniformly impregnated with microcrystalline wax; within this wax is a non-mercurial fungicide which renders the lacing material mildew- and fungus-resistant. In addition, any 713A cord must withstand a thirty-pound pull and be neither hygroscopic nor tacky.
Presently, commercial lacing cord is woven into a flat braided cord consisting of six, eight, or twelve plies. These cords are respectively identified as Class 3, Class 2, and Class 1. Class 3 cord, having an average thirty-two pound test, is well suited for amateur work; occasionally, large harnesses might require a Class 2 cord. Lacing cord comes in either black or white, but black is more appropriate since it blends well with other colors and does not show dirt marks. The cost is reasonable - approximately six-tenths of a cent per foot. If your local distributor does not stock 713A cord, I would suggest writing to any of the companies listed at the end of this article.
Preparatory measures
Before you start lacing, here are several helpful suggestions. Since lacing may be executed most rapidly when your hands can be placed in any position relative to the harness, try to mount components either on a Minibox or the bottom plate of a chassis base. While you are soldering wires to components, start training the leads so that they lie parallel in the harness; the less the wires crisscross, the neater the harness will look. Sometimes it is easier to lace small bundles even before they are soldered into the circuit. In other instances the cable leads at one end might first be soldered, the cable next laced, and then the leads soldered at the opposite end.
For a good safety margin, cut the length of your cord three times the length of the wires. Once the running stitch is started, refrain from tightening the knot of the stitch so tight that the insulation on the wires is cut. Often, long-nose pliers or tweezers become a real necessity in crowded places. Use a double-running stitch at all times and space stitches approximately 1¼ inch apart. For a neat appearance always turn the knot of any finished stitch flush with the chassis. Last, isolate r.f., grid-input, and veryhigh-voltage leads from any harness.
Anchoring the cord
Let's begin the starting stitch. With the shorter end of the cord in your right hand, loop the cord twice around the wires and then make the first half of a square knot by running the shorter lead under the longer (Photo 1). Pull uniformly on both ends and then, grasping the shorter lead, start the last half of this knot by looping the longer lead around the shorter (Photo 2). With the shorter lead, complete the stitch with a half-hitch knot (Photo 3). After twisting the knot flush with the chassis, prune off any remaining length on the shorter lead.
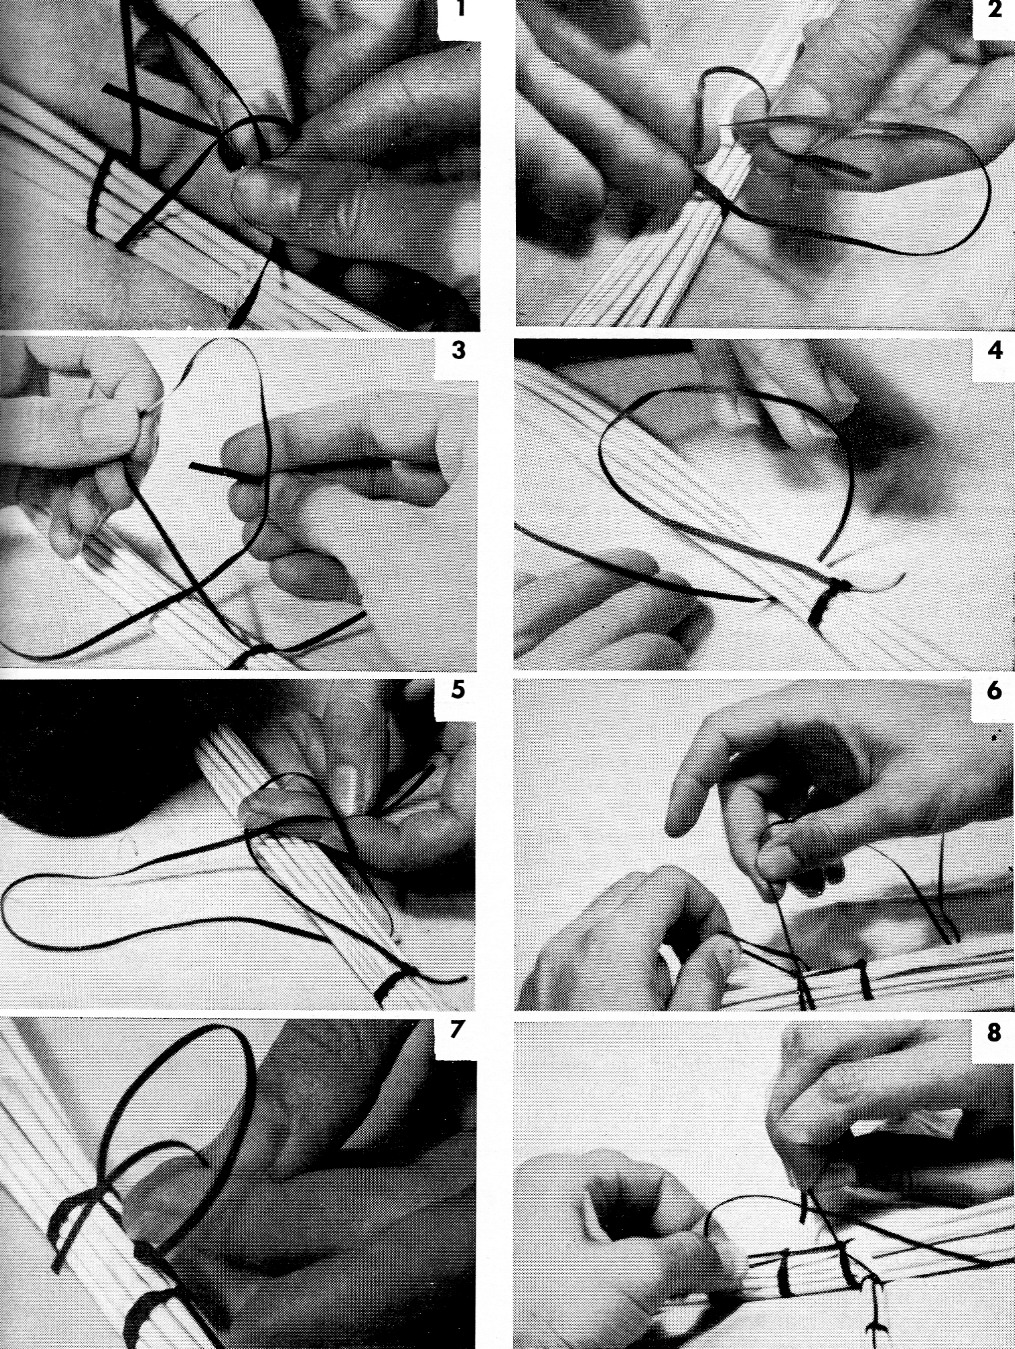
The first eight photographs show the various steps to be followed in lacing cabled wiring. (1) The lacing cord has just been looped twice around a harness to begin the starting knot. The first half of the square knot is now finished by pushing the shorter end over and then under the longer lead. (2) Here the square knot is being completed by running the shorter lead around and under the longer end. (3) A half-hitch knot now completes the starting stitch. (4) A double running stitch is started by swinging the cord around the top and then under the cable. A 300-degree arc has just been completed, and the free end is now ready to be pushed through the loop which has been formed. (5) The free end is now guided through the loop. After this knot has been pulled tight, notice that the cord entering and leaving this stitch always rests against the wires. (6) Here the double running stitch is being completed by executing an identical single running stitch over the one which has just been finished in the preceding photo. Again, the free end should be flush with the wires. (7) The ending stitch is very similar to the double running stitch. The double running stitch has just been finished, and one of the two half-hitch knots is now being made. (8) Here the splice stitch is being completed. The first half of a square knot has just been finished, and now the shorter lead is being swung around and under the longer end. This end can be used to continue the running stitch.
Lacing stitch
To begin a double running stitch, hold the free end of the cord close and parallel to the harness. Swing the cord around the top of the harness and proceed to make a 360-degree arc (Photo 4). Now run the free end through the loop which has just been formed (Photo 5). While pulling this single running stitch tight, work the knot under the harness and guide it in line with the starting knot. Repeat this procedure to form another identical single stitch over the original stitch (Photo 6). This completes a double running stitch.
Ending stitch
The ending stitch is only a slight variation of the double running stitch. Begin this stitch by completing a double running stitch. Then form two half-hitch knots by running the free end of the cord under the lead from the previous running stitch (Photo 7). Pull the knots tight and trim any extra length from the free end.
Branching cables
Often you may wish either to join a lead from a branch to the main lacing cable or to splice an additional length of cord to the main cable. Execute a double running stitch in the position where you wish to locate the splice. Next, using the free end of the main lacing cord, form the first half of a square knot around the lead; now complete the knot, using this lead, and cut off any extra line from it (Photo 8).
Spot ties, which are identical with the starting stitch, are convenient, too. They are used only on very short branches which require three or less stitches.
A good lacing technique requires a few hours of practice. Why don't you now run through these stitches using some string and a broom handle?
For a climactic finish, paint the starting and ending stitches with a clear plastic glue or glyptal. You'll agree that there isn't a neater piece of gear in town than the piece you have just finished lacing!
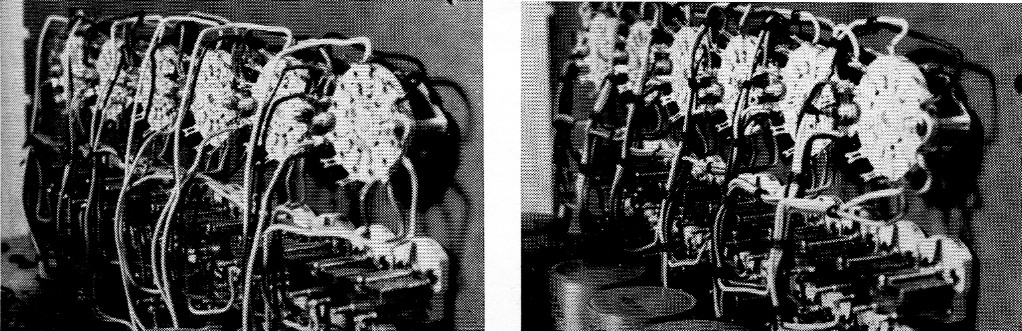
Only a small length of lacing cord has drastically changed the appearance of these identical chassis in the two bottom photographs. Leads from the unlaced chassis, left, are being trained to lie in small harnesses, right, and temporary spot ties have just been made to hold the last three harnesses together.
Acknowledgments
I am indeed grateful to several persons whose helpful advice and guidance made this article possible. I wish to extend my many thanks to Mr. and Mrs. Vernon Thackeray, W5CSY and W5ZUD, who took the excellent pictures. I am grateful to Mr. Conny Fleissner, W5GEQ, Mr. Jim Hurlbut, and the employees of Crown Engineering in Albuquerque who gave me their excellent assistance and who allowed me to photograph their two chassis.
Ralph Rosenbaum, W5ECP.