The easy box; home-made cabinets with hammer and vise
Tired of the same old utility box designs? Here's information on how to form your own cabinets with ordinary workshop tools. All that's needed is a set of sheet metal shears, a vise, and a rubber- or rawhide-headed hammer. The boxes can be made from aluminum, copper, brass, or galvanized iron, depending on choice of the builder. h eavy-gauge stock produces a cabinet with good rigidity. Miniature enclosures can be formed from 18- or 20-gauge material.
The cabinet style shown in Fig. 1 is the outgrowth of an immediate need for a box in which to build an s.w.r. bridge. To keep the cost low, and have a cabinet with a recessed panel, it was decided that "home-brewing" would be the most practical solution. Happily, the effort produced a simple enclosure which took about 30 minutes to fabricate.
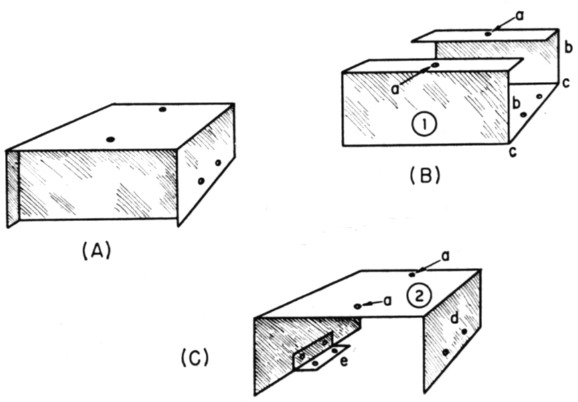
Fig. 1. Details for forming the Easy Box. The completed box is shown at A. Information concerning parts B and C of the drawing is given in the text.
Layout and forming
After deciding what size the box will be, lay out the pattern for the bottom half (Fig. 1B) with a square and scribe, scratching marks on the metal where the bends will be made. Form the bends marked c by placing the stock in a vise and warping the metal around the jaws of the vise until a 90-degree angle is secured. When forming bends with large pieces of metal, the stock can be warped over the edge of the workbench by clamping it between the surface of the bench and a piece of angle iron. The angle iron can be held in place with C clamps. Next, form bends b similarly. If a sharp bend radius is desired, a rawhide hammer can be used to flatten the metal.
Before forming the cover, part 2, measure the outer dimensions of the completed part 1. Use these dimensions when laying out part 2. The clinker here is that you will have to make bend allowances for the thickness of the metal, at d, so that the lid will fit the bottom half of the box. In other words, if the metal thickness is e inch, allow an additional I% inch of metal for each bend made. A little practice will reveal how easily this can be done.
An angle bracket (item e, Fig. 1C) is bolted to each side of the lid with 4-40 hardware. The lid is attached to the lower part of the box by securing the angle brackets to part 1 with No. 6 sheet-metal screws. If additional strength is desired, sheet-metal screws can be used at the points marked a. If heavy-gauge metal is used, this should not be necessary.
Finishing touches
Boxes of this style are handy for housing field-strength meters, s.w.r. bridges, transmatches, and similar items. The appearance of such gear can be enhanced by painting the cabinet and labeling the controls with decals. A two-tone finish will add to the professional appearance of the equipment.
Make certain that the bare metal is free of grease and dirt before painting it. A coating of zinc chromate will be useful as a primer, enabling the finish coat of paint to adhere to the cabinet.
Zinc-chromate and finish paints are available at most hardware stores. They are sold in spray cans, making the job of painting a simple chore. If you're interested in having your equipment look a bit more original, try the Easy Box!
W1CER