8-band backpacker special
Here's a portable antenna that you can use for backpacking or camping - not to mention Field Day.
Many hams have discovered the value of using Amateur Radio in conjunction with other hobbies ranging from backpacking to bicycling. Those convenient VHF or UHF hand-held radios are great for short-range communications, but what if you need to talk hundreds or thousands of miles? The answer: HF radios, often QRP style to minimize size and weight. A problem you'll run into as you get set up for portable HFoperation is finding an easily transportable antenna that's efficient enough to let your QRP signal reach out and touch someone.
A simple dipole antenna, usually strung inverted-V style, is hard to beat in terms of efficiency and simplicity. Fan-dipoles work well for two or three hands, but how would you make an easily transportable antenna to cover 80 through 10 meters without creating a tangled mess of wires? Try this 8-Band Backpacker Special! This is what I use on my backpacking adventures; it lets me hop between two bands without even having to get out of my sleeping bag to make adjustments. (See my article, "Operating Backpack Portable," QST, April 1994.)
| Band (CW) | Basic Element | Extension length(a) | Total element(b) length | Antenna electrical length |
|---|---|---|---|---|
| 80 m | 40 m | 32 ft 11 in | 63 ft 8 in | ½ λ |
| 40 m | 40 m | none | 32 ft 9 in | ½ λ |
| 30m | 20m | 7 ft 2 in | 24 ft 4 in | ½ λ |
| 20m | 20m | none | 17 ft 2 in | ½ λ |
| 17m | 40m | 7 ft 2 in | 39 ft 11 in | 1½ λ |
| 15m | 40m | 1 ft 6 in | 34 ft 3 in | 1½ λ |
| 12m | 20m | 7 ft 2 in and 4 ft 9 in | 29 ft 1 in | 1½ λ |
| 10m | 20m | 7 ft 2 in and 1 ft 6 in | 25 ft 10 in | 1½ λ |
Construction
The Backpacker Special consists of a 20-meter/40-meter fan dipole that has extensions clipped to the ends of the elements to make the overall antenna ½ or 1½ wavelengths long on each band. (As used in this article, an element is one-half of a dipole.) Table 1 shows the lengths of the various extensions that need to be added to the basic antenna to make it cover the eight HF bands; each extension has an alligator clip soldered to one end. Several extensions are reused in the various configurations to minimize the amount of wire carried, reducing the weight and bulk of the antenna. (My pack dog, who carries the antenna on backpacking trips, appreciates the fact that the antenna weighs only 1.4 pounds and doesn't take up much space - it leaves more room for dog chow.) The lengths given in Table 1 , typically resonate the antenna on the low edge of the CW bands; for the Novice subband the length of the 40-meter element may need to be shortened about 4 inches, and the 80-meter extension shortened about 18 inches.
Figure 1 illustrates the details of the antenna's construction. I like to use #20 AWG magnet wire for the main elements and #24 AWG for the shorter extensions. The #20 AWG is strong enough to allow it to be pulled down when tangled in tree branches, without breaking the wire. About 32 feet of RG-174 coax is convenient for the feed line. Make sure to strain-relieve the coax at the center insulator. A BNC splice can be inserted close to the center insulator if you want to be able to steal the coax to use with your VHF antenna (a 30-foot length of RG-174 will have about 3 dB loss at 144 MHz).
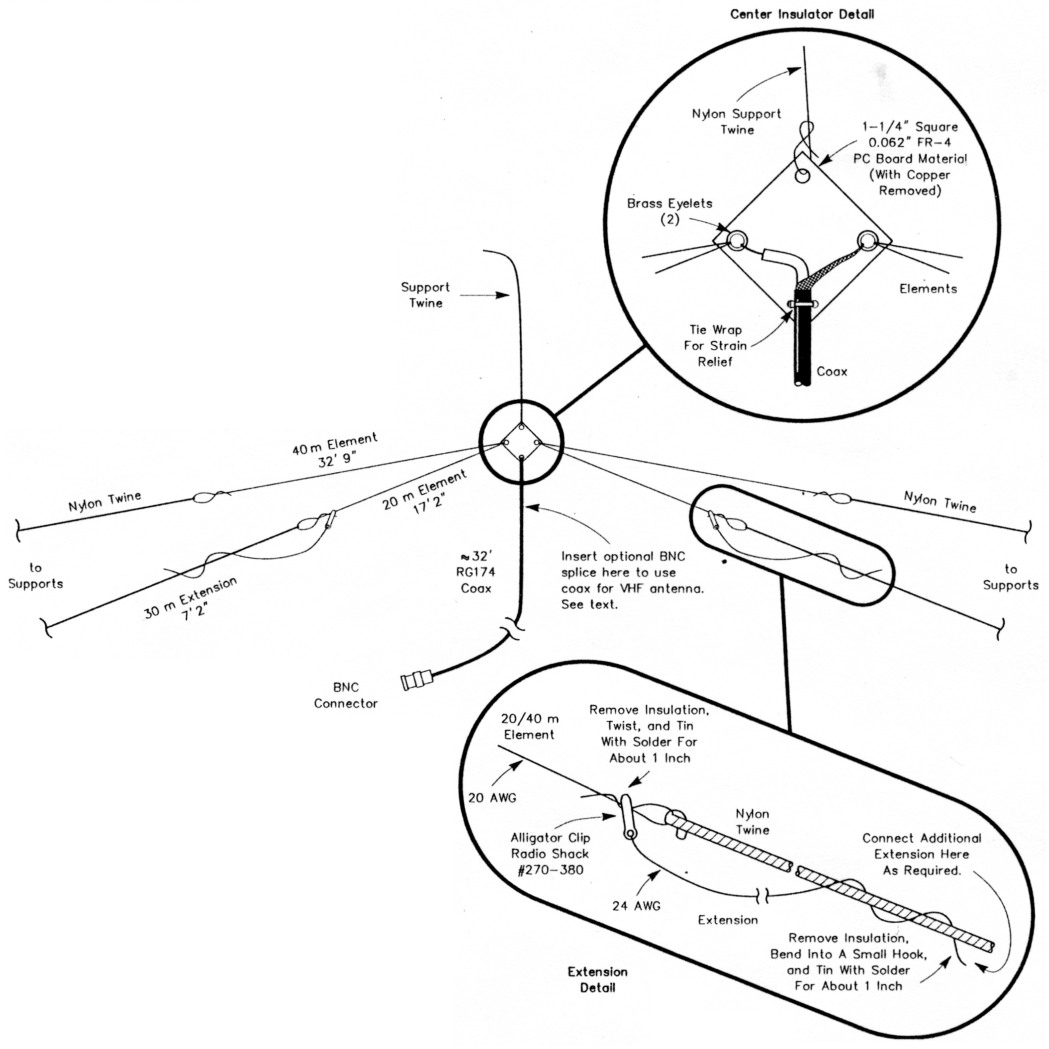
Figure 1 - Construction details for the 8-Band Backpacker Special antenna. (Shown configured for 30 and 40-meter operation.)
Check the antenna with an SWR meter before you take off on your adventure by setting it up in the backyard or in a park. Install it at whatever apex and element height you think you'll usually use. When I use it, the apex is often supported by a tree branch 15 to 25 feet above the ground and the ends of the elements are 6 to 8 feet high. If you let the ends of the elements get too high, it's hard to reach them to attach the extensions!
Materials
You may be able to use your creativity and junk box to reduce the need to go out and buy everything for this antenna. Few, if any, ham dealers will carry the miniature RG- I74 coax or connectors. RG-58 is fine if you don't mind the extra bulk and weight. The nice thing about the. magnet wire I've specified is that it has a thin film of insulation that will burn off easily during soldering (no need to strip the insulation in advance); but most any type of wire will do. FR-4 PC board material can be identified by viewing the edge of the board and looking for thread-like filaments imbedded inside the material. If you don't have any old FR-4 in your junk box, substitute a high-temperature plastic or some varnished wood (avoid phenolic PC board material because it's too brittle).
If you heed a source for the wire and connectors try your local electronics distributors, or you can order them by telephone from:
- Arrow/Capstone: 800-833-3557 ($50 minimum order)
- Newark Electronics, either your local outlet or their national order line: 800-281-4320 ($25 minimum order)
Parts list
- #20 AWG magnet wire - Belden 8050 (approx. 160 ft/0.5 lb spool)
- #24 AWG magnet wire - Belden 8052 (approx. 404 ft/0.5 lb spool)
- RG- I74 miniature coax - Belden 8216 (it comes in a 100-foot spool)
- BNC Plug for RG-174 (clamp style)Amphenol type 69475
- BNC Plug for RG-174 (crimp style*) - Amphenol type 31-315
- BNC Jack for RG-174 (crimp style*) - Amphenol type 31-317
Hardware stores and Radio Shack have various sizes and styles of alligator clips, tie wraps, and brass eyelets that are useful.
*Crimp connectors can be used without a crimp tool by soldering the collar over the coax braid rather than crimping it on. Take care not to melt the coax center conductor. After it's soldered, place a couple of inches of heat-shrink tubing over the collar and coax jacket for strain relief.
Antenna Tips
- If you mount the antenna unusually low, the antenna will behave as though it's longer and tune up low in frequency. Clipping the extensions on a few inches from the end of the basic element will help compensate for this effect. If mounted high, the antenna will act as if it's shorter, so you may need to add a short extension (try six inches for starters) to make it tune properly.
- Ground conductivity can affect the tuning. Raising or lowering the ends can help compensate for this variation, as can the two remedies mentioned above.
- Nylon twine works well as an end insulator and support. Have these ropes pre-cut (the apex rope 50 feet long and the element ropes 20 feet long) and wind them up on some type of form. A few 3 and 6-foot sections are handy, too.
- Keep the entire kit in a gallon-size Ziplok plastic bag to keep things together, with smaller items in a quart-size bag.
WB0KRX, Jim Andera.