SMTP server
The Simple Mail Transfer Protocol (SMTP) is a communication protocol for electronic mail transmission. As an Internet standard, SMTP was first defined in 1982 by RFC 821, and updated in 2008 by RFC 5321 to Extended SMTP additions, which is the protocol variety in widespread use today. Mail servers and other message transfer agents use SMTP to send and receive mail messages. Proprietary systems such as Microsoft Exchange and IBM Notes and webmail systems such as Outlook.com, Gmail and Yahoo! Mail may use non-standard protocols internally, but all use SMTP when sending to or receiving email from outside their own systems. SMTP servers commonly use the Transmission Control Protocol on port number 25.
User-level email clients typically use SMTP only for sending messages to a mail server for relaying, typically submit outgoing email to the mail server on port 587 or 465 as per RFC 8314. For retrieving messages, IMAP and POP3 are standard.
To collect your email you need IMAP or POP3. This works together with smtp for sending as a total mail-system. For webmail you need an web-interface like roundcube.
Configuration of postfix is an complex one. So we have to test postfix at several stages.
Functions
Postfix has two functions:
- Receiving mail from clients
- Sending mail to recipients.
Demands
We want postfix to:
- Send mail to local and external email-addresses.
- Receive mail from every where for valid users on our domain(s).
- Only processes on the host that run postfix can send mail without authentication.
- Every one else must secure authenticate.
- To serve multiple domains.
- Must not relay from external domains to external domains. Open relay.
Installing postfix
# dnf install postfix postfix-mysql
Configuration postfix
# cd /etc/postfix
# ll
total 220
-rw-r--r--. 1 root root 21111 Sep  8  2019 access
-rw-r--r--. 1 root root 13194 Jun  3  2018 canonical
-rw-r--r--. 1 root root    60 Nov  5  2023 dynamicmaps.cf
drwxr-xr-x. 2 root root     6 Nov  5  2023 dynamicmaps.cf.d
-rw-r--r--. 1 root root 10221 Sep 17  2016 generic
-rw-r--r--. 1 root root 23802 Oct  9  2016 header_checks
-rw-r--r--. 1 root root 29369 Nov  5  2023 main.cf
-rw-r--r--. 1 root root 29130 Nov  5  2023 main.cf.proto
-rw-r--r--. 1 root root  6372 Nov  5  2023 master.cf
-rw-r--r--. 1 root root  6372 Nov  5  2023 master.cf.proto
-rw-r--r--. 1 root root 20163 Nov  5  2023 postfix-files
drwxr-xr-x. 2 root root     6 Nov  5  2023 postfix-files.d
-rw-r--r--. 1 root root  6929 Feb 14  2016 relocated
-rw-r--r--. 1 root root 13436 Jan 11  2020 transport
-rw-r--r--. 1 root root 13963 Jun  3  2018 virtual
You can list default settings by # postconf -d.
Directing system users to email-addresses
We can route the system users to an normal mail address. We need to set some things first. When you open aliases check that every thing points to the right user.
Targets are root, postmaster, webmaster. These will link to users in the vmail database.
# cd /etc
# vi aliases
# Basic system aliases -- these MUST be present.
mailer-daemon:  postmaster
#postmaster:    root
postmaster:     postmaster@example.com
webmaster:      webmaster@example.com
root:           root@example.com
# newaliases
If you want you can make aliases in the vmail database for root@example.com, webmaster@example.com and postmaster@example.com to normal addresses.
If you choose not to uses aliases you need to make user accounts for them.
mariadb-vdomains.cf
Next we setup mysql access. YourPasswordHere is the same we used when we created the mysql user vmail.
This query test for a valid mail domain.
# vi mariadb-vdomains.cf
user = vmail
password = YourPasswordHere
hosts = 127.0.0.1
dbname = mail
query = select 1 from domains where DomainName='%s'
mariadb-vusers.cf
This query test if the recipient is valid.
# vi mariadb-vusers.cf
user = vmail
password = YourPasswordHere
hosts = 127.0.0.1
dbname = mail
query = select 1 from users where Email='%s'
mariadb-valias.cf
This query return the recipient for a alias.
# vi mariadb-valias.cf
user = vmail
password = YourPasswordHere
hosts = 127.0.0.1
dbname = mail
query = select Destination from aliases where Source='%s'
main.cf
Global Postfix configuration file. This file lists only a subset of all parameters. For the syntax, and for a complete parameter list, see the postconf(5) manual page (command: "man 5 postconf").
master.cf
Postfix master process configuration file. For details on the format of the file, see the master(5) manual page (command: "man 5 master").
Do not forget to execute systemctl restart postfix after editing this file.
Setting up the master.cf file.
Checking
# postfix check
# systemctl status postfix
Starting postfix
# systemctl start postfix
# systemctl enable postfix
Firewall
# firewall-cmd --permanent --add-port=25/tcp
# firewall-cmd --permanent --add-port=465/tcp
# firewall-cmd --permanent --add-port=587/tcp
# firewall-cmd --reload
Testing
Testing TLS
We can test is the TLS settings are OK.
# testssl -t smtp smtp.example.com:25
# testssl -t smtp smtp.example.com:587
# testssl smtp.example.com:465
If there are errors or a T grade solve this first.
Testing mysql access with postmap
At this point it is essential to check whether Postfix has access to the database tables and the domains, accounts, and alias that we created.
When there is no answer the query is false. An 1 or emailaddress is a valid answer.
# systemctl restart postfix
# postmap -q example.com mysql:/etc/postfix/mariadb-vdomains.cf
1
# postmap -q example.org mysql:/etc/postfix/mariadb-vdomains.cf
# postmap -q info@example.com mysql:/etc/postfix/mariadb-vusers.cf
1
# postmap -q tecmint@example.com mysql:/etc/postfix/mariadb-vusers.cf
# postmap -q root@example.com mysql:/etc/postfix/mariadb-valias.cf
jdoe@example.com
#
Testing smtp with telnet
Install the telnet client if not already done.
# dnf install telnet
Before you start testing be sure that dovecot is running. It does the autentication for postfix.
Before you can test the login you must put a # before smtpd_tls_auth_only = yes and restart postfix. This will show 250-AUTH PLAIN LOGIN.
If there is an @ in the username then this caracter must preceed with an \ to escape. So user\@example.com. This will be the case with our virtual server.
We must encode the username and psssword.
# perl -MMIME::Base64 -e 'print encode_base64("user\@example.com");'
dXNlckBleGFtcGxlLmNvbQ==
perl -MMIME::Base64 -e 'print encode_base64("password");'
cGFzc3dvcmQ=
We can now start testing the autentication on smtp.
VXNlcm5hbWU6 means username
UGFzc3dvcmQ6 means password.
# telnet localhost 25
Trying ::1...
Connected to localhost.
Escape character is '^]'.
220 server1.example.com ESMTP Postfix (3.5.9)
ehlo localhost
250-server1.example.com
250-PIPELINING
250-SIZE 4194304
250-VRFY
250-ETRN
250-STARTTLS
250-AUTH PLAIN LOGIN
250-ENHANCEDSTATUSCODES
250-8BITMIME
250-DSN
250-SMTPUTF8
250 CHUNKING
auth login
334 VXNlcm5hbWU6
dXNlckBleGFtcGxlLmNvbQ==
334 UGFzc3dvcmQ6
cGFzc3dvcmQ=
235 2.7.0 Authentication successful
......
quit
221 2.0.0 Bye
Connection closed by foreign host.
We now know that sasl functions. You can now remove the # before smtpd_tls_auth_only = yes and restart postfix if you want TLS only login.
If you run the telnet test again 250-AUTH PLAIN LOGIN will not be shown.
You still can send mail unauthenticated when you are connected via telnet to the smtp server.
Testing smtp with openssl and starttls
# openssl s_client -connect smtp.example.com:587 -starttls smtp
........
    Start Time: 1611510351
    Timeout   : 300 (sec)
    Verify return code: 21 (unable to verify the first certificate)
---
250 DSN
ehlo localhost
250-server1.example.com
250-PIPELINING
250-SIZE 10240000
250-VRFY
250-ETRN
250-AUTH PLAIN LOGIN
250-ENHANCEDSTATUSCODES
250-8BITMIME
250 DSN
auth plain
.....
235 2.7.0 Authentication successful
quit
221 2.0.0 Bye
Connection closed by foreign host.
Testing smtps with openssl
# openssl s_client -connect smtp.example.com:465
.....
235 2.7.0 Authentication successful
quit
221 2.0.0 Bye
Connection closed by foreign host.
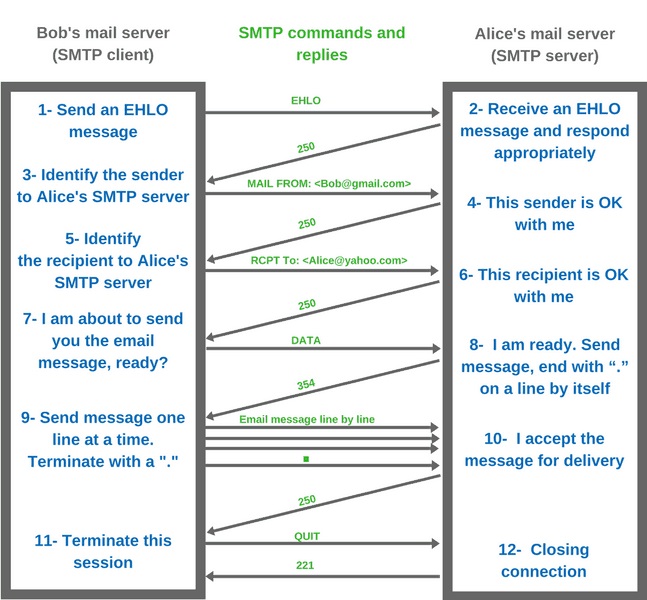
Send an e-mail
Now we get to the good stuff! We need at least these details to be able to send an e-mail:
- The sender (MAIL FROM)
- The recipient (RCPT TO)
- and the message body (DATA)
You must always start with the mail from command, as this tells the SMTP server that a new mail transaction is started.
We follow that up by the recipient's address and finally the message subject and body. Both the subject header and body are passed via the data command.
Once we are ready to send our message, we end with a single dot (.) character. Here's how that looks if you put it all together:
# telnet smtp.example.com 25
ehlo smtp.example.com
.....
235 2.7.0 Authentication successful
mail from: from@example.com
250 2.1.0 Ok
rcpt to: john@doe.com
250 2.1.5 Ok
data
354 End data with <CR><LF>.<CR><LF>
Subject: Test message!

Hi,

This is a test message!

Best,
Steven.
.
250 2.0.0 Ok: queued as 4DF041020432
quit
#
Check e-mail for john@doe.com.
Mail clients
When the mail was send and received we need mail-clients.
Cmd-line client
In Red Hat Enterprise Linux 9 (RHEL 9), sending emails through the command line can be accomplished using s-nail, a feature-rich implementation of the mailx command. This medium will guide you through the process of configuring s-nail to send emails securely using SMTP with STARTTLS and login authentication.
# dnf install s-nail
Graphical mailclients
You can now use an email-client like Thunderbird or Outlook and test the system.
Webmail
If you want you can install an webmail system like roundcube to access your mail without an email-client.
Setting port-forwarding in your router
The mail system is ready to go online. We need to set the mailports in the router to our server. Set IPv4 and if available IPv6.
When dovecot doesn't work with START-TLS don't forward 110 and 143.
Forward ports 25, 465, 587, 110, 143, 993, 995 to the server.
We can start with the final tests.
Testing the basic system
First the postfix/dovecot system must be running and accessible from any client you have.
Sent mail between users in the same domain. This have already done withe the telnet/openssl tests.
Use an alias as a target.
For test purposes make errors in the domainnames and user names and see if they are correctly handled.
If you have more domains running on your system sent mail between them.
Sent mail to external addresses and receive from them. Use your ISP email-address for this. Gmail etc might not allow your mail yet.
If this works well we can continue.
Mail security and authentication
Before you continue be sure the postfix/dovecot system works.
Setup the below one at a time and test if it works before you go to the next.
SPF
SPF will ensure that the only verified servers/IP addresses may send mail from a given domain.
DKIM
DKIM will sign all outgoing messages with verification keys to prevent ending up in the junk box.
DMARC
DMARC ensures that both DKIM and SPF are properly enforced.
ARC
Authenticated Received Chain (ARC) allow an intermediate mail server like a mailing list or forwarding service to sign an email's original authentication results.
For our mail server this is not neccesary. So we can skip it for the moment and do it when we need it.
Testing
When the above is working correctly, send an email to an gmail account and see what happens.
Check the source of your mails. <Ctrl>-U.
If every thing works then we can go further with the setup.
MTA-STS and TLS reporting
When TLS-RPT is enabled, email-sending services know where to send automated reports about TLS connections failures. The recipients of the reports can then assess and fix any potential issues. TLS-RPT will give you more assurances to progress to an MTA-STS policy of "enforce".
Setting up mta-sts and TLS reporting.
BIMI
Nowadays, most companies rely on communication through email. Using Brand Indicators for Message Identification (BIMI) is a great opportunity to build more trust amongst your receivers. Instead of the usual initials, your company's logo is being displayed next to your messages.
You can skip BIMI and do the Anti-virus and spam protection first.
Anti-virus and spam protection
When the mailsystem works you can add anti-virus and spam filters. This will work for incomming mail.
We start with building the chain postfix -> Amavis -> postfix without anti-virus and spam-check.
When this works enable anti-virus. Test that it works correctly. The maillog file will show that the mail was clean.
Oct 9 19:43:50 server5 amavis[45158]: (45158-01) run_av (ClamAV-clamdscan) result: clean
Clam-av works also outside the mail-system.
At last enable spamassassin. Test that it works correctly. That means that normal mail should be send/received.
The mailsystem is now ready.
Postgrey
Installation
# dnf install postgrey
Configuration postgrey
There is no configuration to do.
Its stores its data-files at: /etc/postfix/.
-rw-r--r--. 1 root root     9666 Sep 22  2016 postgrey_whitelist_clients
-rw-r--r--. 1 root root       59 Jul 19  2022 postgrey_whitelist_clients.local
-rw-r--r--. 1 root root      188 Sep 22  2016 postgrey_whitelist_recipients
Starting postgrey
# systemctl start postgrey
# systemctl enable postgrey
Additional
Some additional setups to do.
Links
- Postfix Documentation
- Chapter 2. Deploying and configuring a Postfix SMTP server
- Enable SMTPS port 465 in Postfix SMTP server for email submission
- 4.13. Hardening TLS configuration
- How to install postfix to obtain maximum scores in MECSA?
- Run your own email server on CentOS 8/RHEL 8 - Postfix SMTP Server
- Check your mail servers encryption
- Hands-on: de implementatie van DANE voor Postfix
- Sending email using s-nail on RHEL 9 with enhanced security measures
- Hands-on: implementing SPF, DKIM and DMARC in Postfix
- 7 Effective Tips for Blocking Email Spam with Postfix SMTP Server